Overclock your Nintendo DS
Game Boy April 15th, 2007“Overclocking old Game Boy Advances is great, but what about what I’m playing right now? Can you overclock a Nintendo DS?” After some research, it turns out the answer is “yes”.
What you need:
- Nintendo DS
- GBAccelerator DS overclocking chip
- Tri-Wing Screwdriver
- Small Phillips screwdriver
- 30 AWG kynar wire-wrap wire
- Low-wattage, fine-tipped soldering iron
- Solder wick (desoldering braid)
- Fine, rosin-core solder
- Wire cutters
- Wire stripper
- Needle-nose pliers
- Double-sided tape
- Cup or bowl to contain small parts
Disassemble your DS
Turn the unit upside down and remove the battery cover and battery
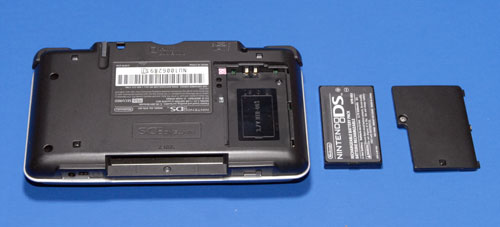
Remove the seven screws that hold the back cover on (some are tri-wing, some are Phillips).
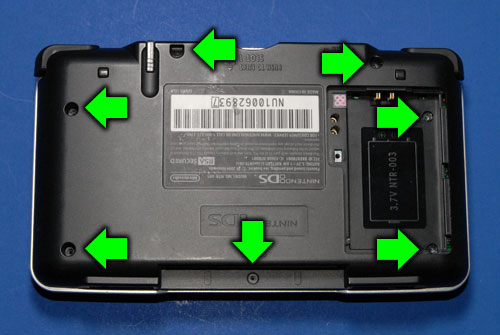
Lift the cover off and set it aside.
Remove the L and R buttons.
Remove the four Phillips screws that hold the PCB in place.
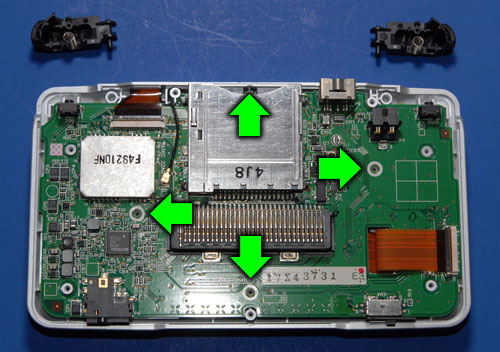
Disconnect the black antenna wire from the RF module and bend it out of the way.
Detatch the two wide ribbon cables that go to the screens from their connectors. Do this by pulling up on the dark grey latch on the connector. Once the latch has flipped to the “up” position the ribbons should slide right out.

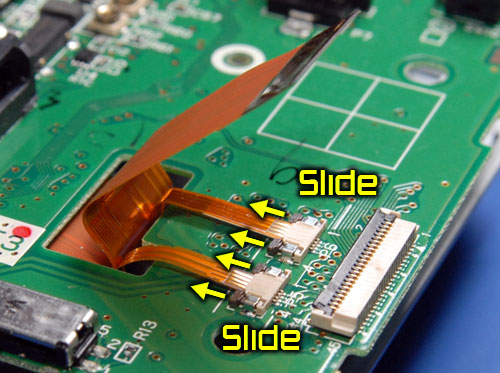
Underneath one of the wide ribbons are two smaller ribbon cables. Disconnect these by sliding the dark brown part sideways (away from the connector).
Remove the PCB from the case and set the case aside.
Remove the existing crystal
There are four tabs on the DS cartridge slot assembly that are soldered to the PCB, holding it in place. Desolder these. The easiest way for me was to use solder wick, but use whatever method works for you.
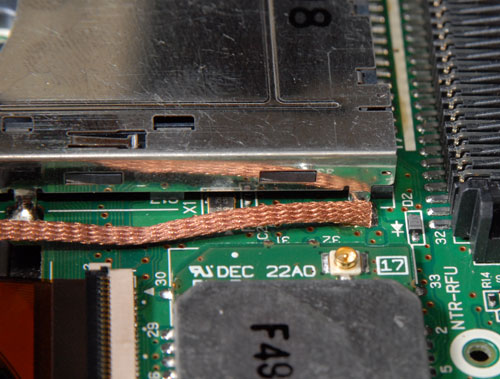
Lift up on the slot assembly. It should swing up, the still-connected pins acting like a hinge. Now you should have easy access to the crystal (X1).
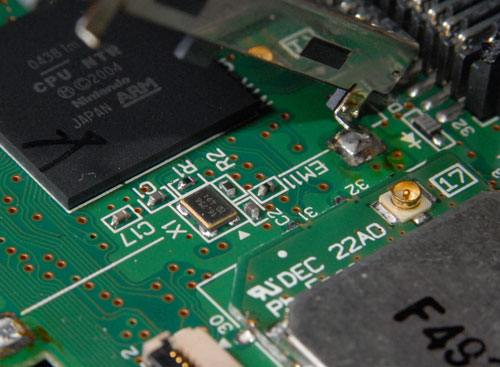
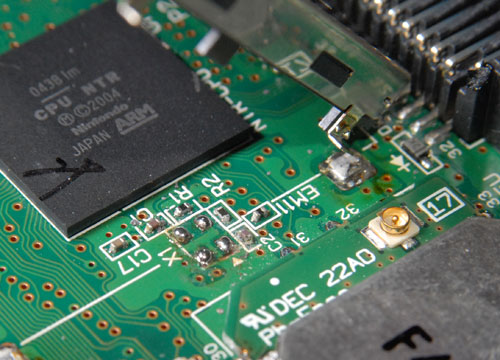
Desolder and remove crystal X1.
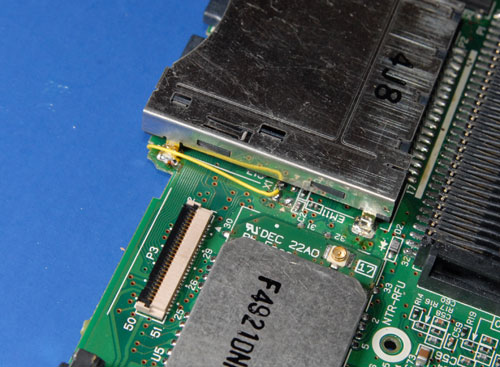
Solder a wire to one of the pads where the crystal used to be (see picture for which one).
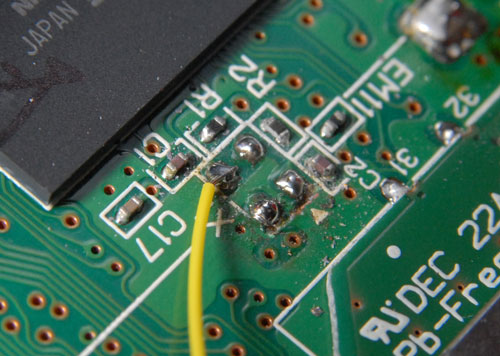
Lower the slot assembly and solder it back into place.
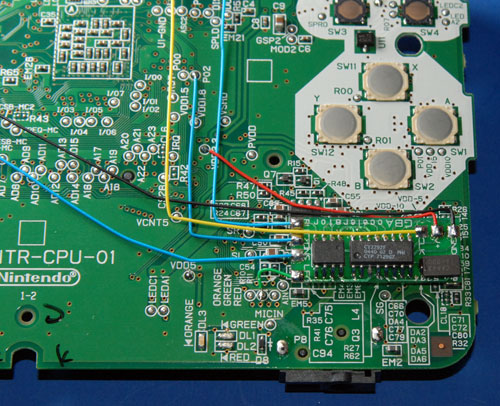
Route the wire to the other side of the PCB as shown:
Install the GBAccelerator DS
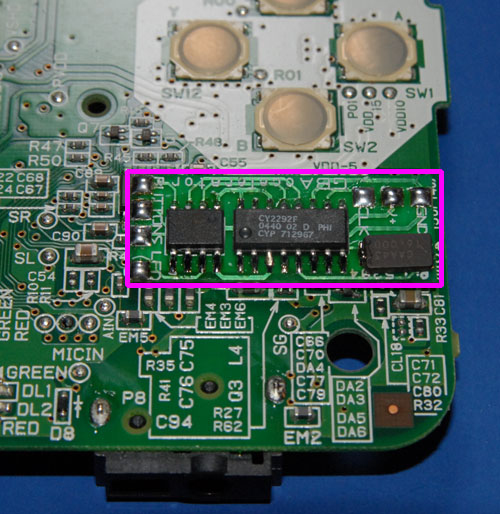
Use double-sided tape to stick the GBAccelerator DS chip to the front of the board. Try to place it exactly as shown in the picture or you may have trouble putting the case back together.
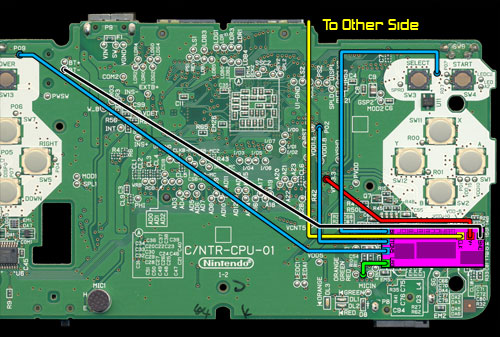
Start routing and connecting wires as shown in this diagram:
|
GBAccelerator DS Connections
|
|
| GND | BT- |
| V+ | VDD3.3 |
| CLK | Solder pad where xtal used to be |
| LED | Green |
| BUTTON | P02 |
| BUTTON | P08 |
| BUTTON | P09 |
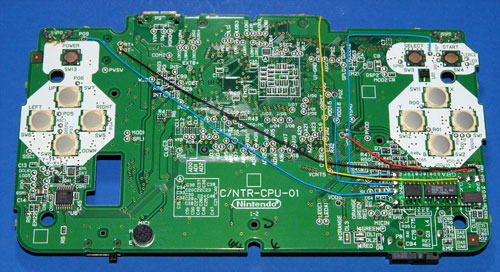
When you’re done it should look like this:
Reassemble your DS
Putting the DS back together is basically the reverse of taking it apart. All your modifications should fit just fine inside the case if you placed everything exactly as shown in the pictures and diagrams. If something doesn’t go back together quite right, don’t force it. Figure out what is pinching or hanging up and move it out of the way.
Testing
Turn on your Nintendo DS. It should boot normally. You probably want to start a game or something so you can see if the mod is actually doing anything.
Press L, R and Select at the same time. The DS should speed up to 1.4x (92mhz), and the LED should now blink every couple seconds.
Press the buttons again. The speed should increase again to 1.8x (116mhz), and the LED should be double-blinking.
Press the buttons again. Now it should be running slower at .66x (44mhz), and the LED should be fading in and out.
One more press of the buttons should bring you back to normal speed (66mhz).
Congratulations! You now have a Nintendo DS that you can overclock any time you want to.


January 26th, 2013 at 10:17 PM
Just installed this, works great. The Crystal X1 was a real pain to remove, I ended up cutting it off with nail clippers because desoldering wasn’t working. Thanks for the tutorial!
March 26th, 2013 at 1:14 PM
Glad it’s working! Yes, the crystal is a bit of a pain. One easier way to do it is to have 2 soldering irons and dual-wield them.
January 10th, 2022 at 11:16 AM
Is there a difference between the “normal” GBACCELERATOR and the GBACCELERATOR DS. I still have one at home and I want to put it into my NDS!?
February 11th, 2022 at 2:29 PM
Yes. The clock speeds are different. You can use a GBAccelerator for a GameBoy Advance or SP, and GBAccelerator DS for Nintendo DS and DS Lite.
April 15th, 2022 at 1:19 PM
Will this work with the newer Nintendo 2ds XL?
March 23rd, 2023 at 12:04 PM
When I installed it the led turns on when I power the console but the screens are black and no sound can be heard.
Even pressing the buttons make the led light change in pattern so it looks like the mod is working but the console won’t turn on.
Could it be that I messed up the R2 capacitor above the crystal x1 when trying to remove it?