Lite F/X Fogger Pump Repair
Haunting November 26th, 2007Gary Adams was kind enough to send in this great article on how to repair the pump in a Lite F/X fogger. Gary reports that he was surprised to find that it was a spring in the pump that had broken, not the O-ring that he suspected would go first.
Fog Machine Pump Repair How-To:
Please read the entire instruction. Note that this instruction may not address the cause of failure for your machine. However, if you have cleaned the daylights out of your fogger and it hasn’t helped, or you hear a loud rattle or buzz when the pump is running but no fog comes out, this is the likely cause.
1. Drain the fog fluid reservoir. Remove the top cover and both side panels as shown. Do not remove the screws that hold the end panels. Remove the fluid container.
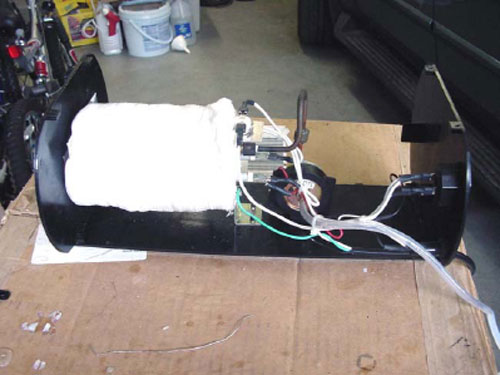
2. Remove the 2 screws that hold the pump retainer plate. Remove the retainer plate.
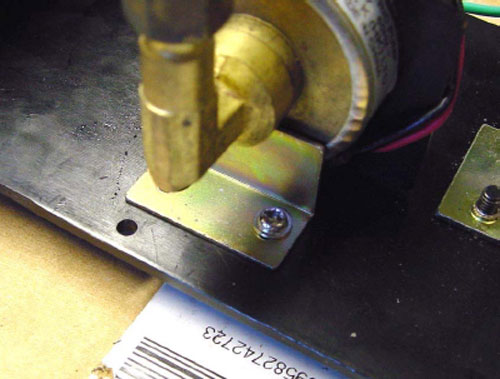
3. Remove the 2 screws that hold the pump bracket. Lift the bracket out of the bottom panel. The pump body can be pressed out of the bracket.
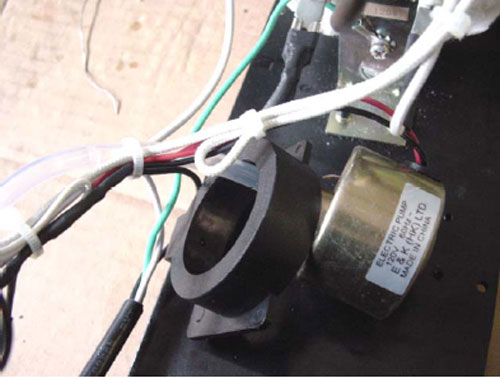
4. Use a wrench to carefully remove the brass tube fitting from the elbow fitting. This fitting may be very tight.
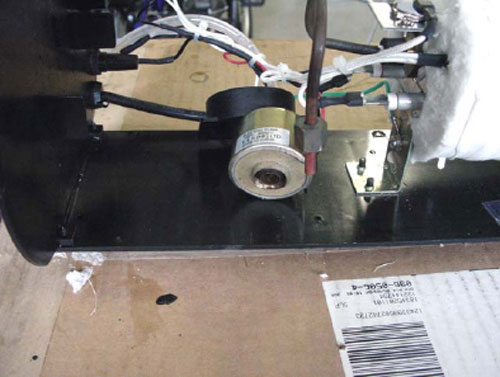
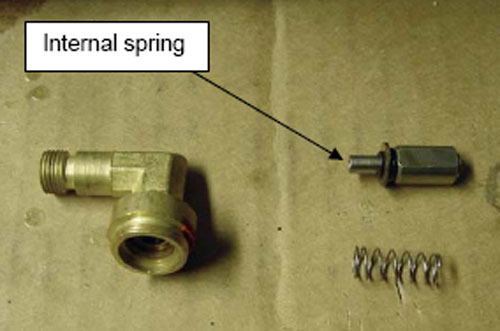
5. Lift the tube out of the elbow fitting. Rotate the elbow to remove it from the pump body. Caution: Depending on the nature of the pump failure, there may be small parts inside the elbow fitting. Look carefully to be sure that no parts fall out and get lost. There is a spring inside of the plunger. This spring may be able to fall out of the plunger. If it does, then this is your problem.
Here’s a pic of the parts inside the pump.
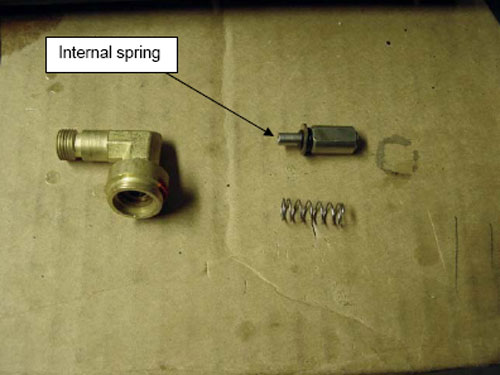
6. Your plunger should look something like this. If the cap on the end of the plunger is missing, look inside the elbow fitting. It may look like a bit of dried fog fluid. Do not lose this part!
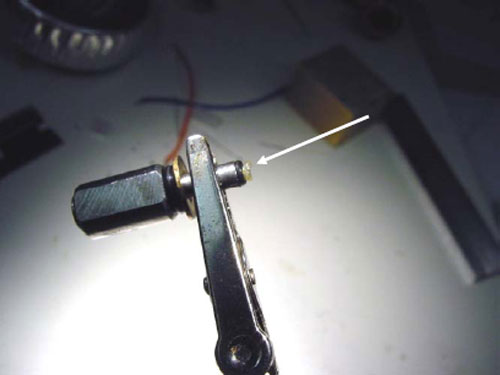
7. The reason my pump failed was that the end loop of the internal spring broke off, and the cap/O-ring fell out of the plunger. This can be fixed easily.
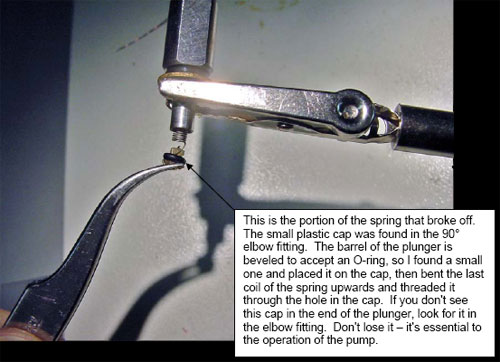
8. It’s a bit difficult to get the O-ring on the cap, but keep trying and you’ll get it. Use a tweezers to bend the last loop of the spring upwards as shown. Insert the spring into the plunger so that the spring loop can be hooked with a wire. Pull it out of the plunger as shown below and insert the loop through the hole in cap.
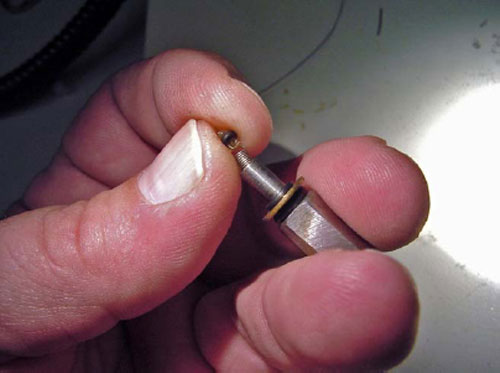
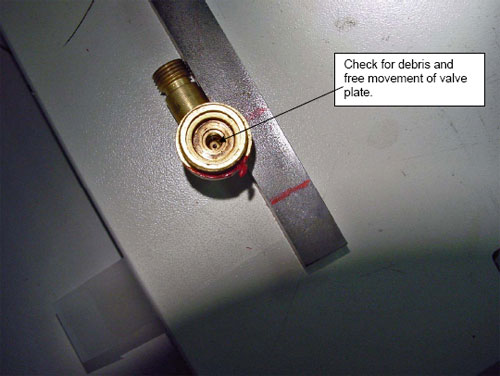
9. Now you have a repaired plunger. Check the other parts for debris, clogs etc before re-assembling the pump. Inside the elbow fitting is a check valve. It is pressed into the fitting and can’t be removed. Press carefully on the valve plate (at the bottom of the fitting) with a stiff wire to make sure that it depresses and returns easily. This valve is what allows the fluid to go into the heater and prevents vaporized fog from coming back into the pump.
10. Wet all the parts with fog fluid before assembling. Insert the plunger into the pump body, large end first. Attach the elbow fitting. Tighten it back to the original position. Insert the brass tube into the elbow fitting and tighten the nut. Press the pump body back into the bracket. Position the bracket and screw it onto the baseplate. Attach the pump retainer plate.
11. Using a small syringe, squirt fog fluid into the intake tube to prime the pump. Make sure that fluid has gone into the pump body. You’ll get some pressure in the line, and will probably get squirted with a bit of fluid. Note: Be sure to check the outlet nozzle for clogs. Remove the nozzle with a socket wrench and clean out any bits of debris. Replace the nozzle.
12. Now to test the repair. You don’t need to re-attach the covers yet. Fill the fluid bottle and place it in the pump. Screw on the cap, plug in the fogger and let it go to work. You may hear a rattle at first as the pump fills, but this should stop pretty quickly. If this was the cause of the fogger failure, you should be pumping out fog big time. If all is well, let it cool down, put the covers back on and store it as-is.


August 14th, 2011 at 5:33 PM
Purchased at thrift store and the pump made a lot of noise when crossing over the center and the bottom slots on the control plug (caution don’t cross over the top plug you WILL blow the fuse a soldered in line 7amp 250 volt. in heat shrink tubing. Replaced with a 5.5 amp fuse. could not find a small O-ring to fit it. so put it all back together and now we have 3rd fog machine for only $3.99. Thank for the WWW
September 2nd, 2011 at 11:52 AM
Nice!
September 8th, 2011 at 12:56 PM
great, but ive lost the cap. ive got the plunger the spring and the o ring, were can i get a cap?…
September 21st, 2011 at 11:12 AM
@Alex: I’m not sure that you can get just the cap. You may have to get the whole assembly from the manufacturer.
September 25th, 2011 at 7:39 PM
Looking for a timer for a Lite F/X fog machine. I have tried other timers but they do not seem compatable. Any thoughts?
September 26th, 2011 at 11:08 AM
That’s a good question. I’ve tried various timers that look the same as the one that’s supposed to work, but they just don’t. I’ll see what I can figure out.
October 9th, 2011 at 3:14 PM
Where can I find a pump assembly for a 1000 watt ground fogger, The # on the pump is 30DSB-ZJF
October 14th, 2011 at 4:57 PM
I don’t know exactly, but sometimes you can just call the manufacturer and order the part. The trick is to sound like you know exactly what you need and that you’ve fixed something before. Say “Hi, I need a replacement pump for a model blah blah fogger” rather than “Hi, my son has one of your fogamathingies and he says it needs a new… um… pump assembly?”.
October 12th, 2011 at 4:36 AM
I picked up a wireless remote for my FX, got it from the spirit halloween store. When I first tried it, it did not work. I searched in google and actually found the wiring diagram on this site! Its here: http://www.modd3d.com/articles/item/make-timer-wireless-remotes-work-on-lite-fx-fog-machines
I re-soldered the wires on the remote and it worked perfect. He also explains how to do the timer as well as the wiring is set up a bit different.
November 4th, 2011 at 5:40 AM
Where can I buy a new pump for my fog machine? Pump # 30DSB-ZJF
November 9th, 2011 at 12:49 PM
Saludos!Quiero agregar que todo lo que as escrito es veridico.
April 30th, 2012 at 1:35 PM
¿What’s The O-Ring Size for replacemnt?
August 28th, 2012 at 6:07 PM
whats the best way to keep the calorific clump/heater from clogging up the copper tube. In my application, the machine is in a game ..so it is hot over 12 hrs a day…and only smokes when being played.
October 16th, 2012 at 6:38 AM
were ca i buy a new pump fog machine fx 1741
October 24th, 2012 at 5:34 PM
@eddie: So far I haven’t been able to find a place where you can buy a single pump for less than the cost of a new fog machine. If you source one, please let us know!
October 20th, 2012 at 3:11 PM
IT LIVES AGAIN We pulled out our old lite fx fog machine and searched what to do… Your clogged pump , directions and photos gave it life again!!! Thanks so much
October 24th, 2012 at 5:31 PM
Glad they helped!
February 16th, 2014 at 2:34 PM
HI, I’m working on my fogger, my plunger has the plastic cap and sting together and in place, but no O-ring, fogger pumps, but very little output, is the missing O-ring my problem? Where can i get one that small? Thanks!
February 18th, 2014 at 3:40 PM
It looks like some of these assortments might go down small enough. You might have to do a little measuring and compare to the sizes they list: https://shop.harborfreight.com/catalogsearch/result?q=o+rings
March 11th, 2014 at 6:39 AM
hi scott, i have a lite fx 1200 machine and the pump is bad. However the pump in this one is plastic what can i do to fix this? Love your mods btw, the are awesome! thanks
November 28th, 2014 at 3:42 PM
I had a 1,000 watt fogger from Spirit that had the pump go out. Turns out it had the exact same problem as yours. Thanks to this tutorial it’s up and running again! Thanks so much!
September 3rd, 2015 at 11:53 AM
Hi Scott,
I pulled everything apart as per your instructions. The pump sounds like it wants to pump but I don’t see any movement in my water line. Someone gave this fogger to me, (Heshan Lide Electronic Enterprise Company Ltd) model FM-400P (5724004) 400 W Intertek
Could the copper wire be plugged up? Also, this machine did not come with the control so I purchased a remote. I thought it was going to work at first, I got a small puff of smoke but then it quickly fizzled away. Could it be that the remote I purchased isn’t as strong as it should be? Thanks for your help!
September 5th, 2015 at 9:11 AM
@Tracy: The remote should either work or not work. If you hear the pump running when you push the button, then it should be fine.
If you disconnect the pump tube from the heater, can you get the pump to pump liquid fog fluid through it?
October 17th, 2016 at 6:11 PM
Your tutorial to fix the pump worked. The pump ran loud. None of the tubing was clogged. Took the pump apart and found the spring was broke. Bent a paper clip to pull the spring back through. It runs now for a few minutes then stops for a few minutes. Something else I’ll have to troubleshoot.
December 24th, 2016 at 12:39 AM
Never do anything yourself that others can do for you.
November 19th, 2019 at 9:51 AM
Hi Steve. Our fogger doesn’t get hot…pump works well. Is this simple fuse fix? Tyvm for your posts.