Change Your XBox LEDs
XBox May 14th, 2006

Are you tired of the puke-green and red LEDs that came with your XBox? Now you can change them in the comfort of your own home. This article walks you through the process step-by-step.
The box uses 2x 3mm bi-color LEDs (one for each side of the ring around the eject button), which turned out to be really hard to find in anything besides red, yellow and icky-green. You can, however, find several good color combinations here. Wherever you get them from, make sure they are common cathode and not common anode. This means that the center pin is negative (-) and the two outside pins for the colors are positive (+).
Here’s what you’ll need for this project:
- T10 Torx screwdriver or bit
- T20 Torx screwdriver or bit
- Flat screwdriver (for prying)
- Low-wattage soldering iron (if you like your XBox DO NOT use one of those giant soldering guns)
- Rosin-core solder
- Solder-sucker or solder-wick
- Mad soldering skillz (okay, so this mod isn’t really too tough. Basic skillz should do fine.)
- Wire cutters
- 2x 3mm common cathode bi-color LEDs
- XBox (duh!)
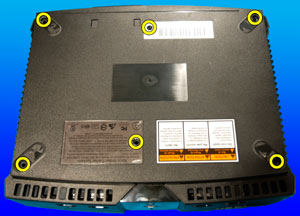
The first thing to do is take apart the XBox. Turn it upside-down and remove the 6 screws with the T20 driver. Four of them are under the rubber feet which you’ll have to peel off, and the remaining two are under the stickers.
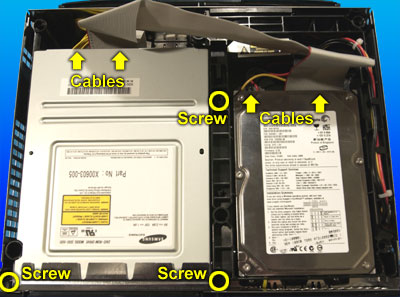
Once you have removed the screws, turn the XBox right-side-up, grab the sides and lift the top of the case straight up and off. Next, unplug the power and IDE cables from the hard drive and DVD-Rom drive. Remove the 3 screws that hold the caddies for both drives in place with the T10 driver. Lift both caddies out (HD first) and set them aside.
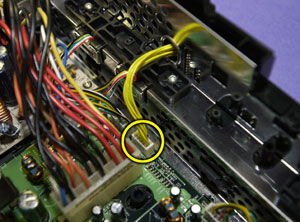
Unplug the front panel connector from the main board.
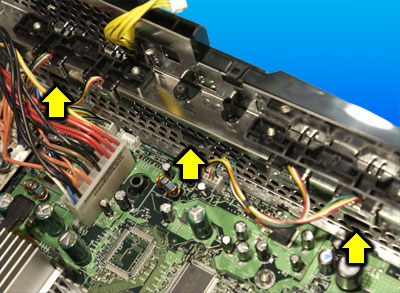
Now it’s time to separate the entire faceplate from the rest of the case. There are 3 tabs and two edges that will all need to be pried free.
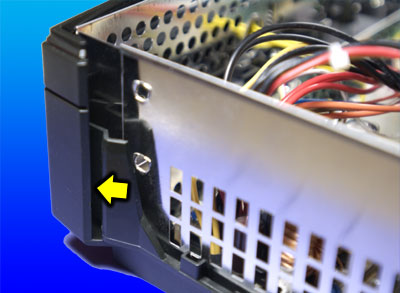
Once you have removed the faceplate, you will be able to see the circuit board that has the LEDs and buttons mounted to it. Separate it from the faceplate by bending the two tabs and lifting the board free.
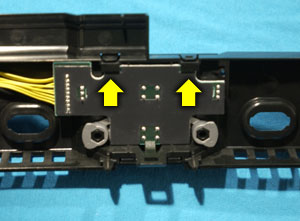
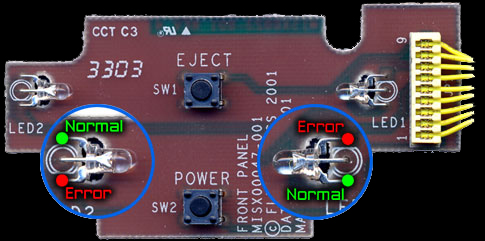
Now that you finally have the board free you can see the LEDs that you are going to replace.
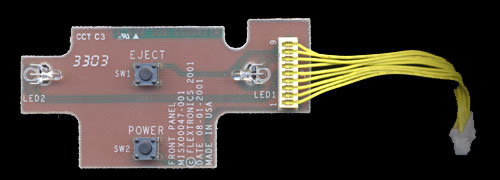
Using your iron and solder sucker or wick, remove the solder from the 6 LED leads that protrude from the back of the board. You should be able to remove the LEDs now. If they are still stuck, apply some heat to the sticking leads.
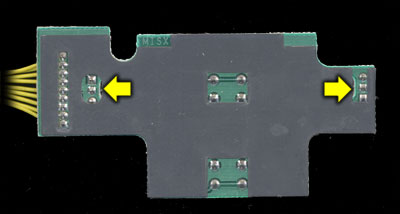
Now you need to figure out which direction to install your new LEDs. First decide which color you want to light during normal operation (was green), and which you want during an error (was red). Use the information that you got from the LED manufacturer to determine which lead corresponds to which color (if you got your LEDs from Division 6 that information can be found here). Look at the diagram below and bend the leads on your LED so that when they are installed the correct color lead is aligned with the correct hole.
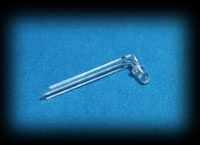
Once you have inserted the leads from your new LEDs through the correct holes and lined them up correctly, solder them into place. Once soldering is complete, trim the excess length off of the leads. The mod is now complete.
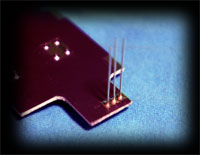
Reassemble your XBox in reverse order of how you took it apart. Plug it in, turn it on, and if everything was done correctly you should have shiny new colors around your eject button!



September 24th, 2013 at 5:22 AM
Question. How much power do the leds need because i probably got the wrong energy. I tried connecting the leds the way that you did and Damn things Wont turn on. Im guessing that either their pulling too much energy or not getting enough. I bought the Blue and red 50 pack on ebay.
September 24th, 2013 at 6:33 PM
The eBay auction probably listed the exact voltage and current specs for the LEDs you bought, but LED specs are all close enough to each other that you should be getting something out of the ones you got. My guess is you got common anode LEDs, where the XBox requires common cathode. This basically means that the LEDs are probably hooked up backwards so they won’t light at all.
I realized that I wasn’t very clear about the required polarity for the LEDs originally, so I’ve updated the article. Thank you for the comment, and let me know what you figure out!
October 11th, 2013 at 5:53 AM
Hello! Again. I wanted to know does the size of the led cathodes matter? 3mm or 5mm. I just recentely bought some 3mm leds but they dont say if their cathodes or anodes. This is for 100pcs New 3mm Blue 5000MCD Round Flangeless Water Clear LED Leds + 100pcs 1/4W 470ohm Resistors
Description
Emitted Color : Blue
Size (mm) : 3mm
Lens Color : Water Clear
Peak Wave Length (nm) : 460 ~ 470
Forward Voltage (V) : 3.2 ~ 3.6
Reverse Current (uA) : <= 30
Luminous Intensity Typ Iv (mcd) : 4000(Typical) ~ 5000(Max)
Viewing Angle : 20 DegreeA pair of them say 5000mcd or 8000mcd.
October 13th, 2013 at 12:53 PM
Size does matter. In order for them to fit right, you should get 3mm. 5mm is too big.
It looks like those LEDs you listed are only a single color. The XBox uses dual-color LEDs.
When I talk about cathode and anode, I’m basically referring to the positive and negative pins of the LED (because LEDs only light if they’re hooked up with the correct polarity). The cathode is the negative (-) pin and the anode is the positive (+) pin.
The bi-color LEDs the XBox uses have 3 pins. Since there are actually two separate sets of LED guts inside one 3mm LED case, it means that they both have to share one of the pins in order for there to only be 3 pins coming out of the case. One is for one color, one is for the second color, and one is a shared common pin.
When they talk about “common cathode” or “common anode”, they are basically telling you if it is the + or – pin that is shared between the two colors. For example, in a common cathode LED, you would hook – to the common pin, then hook + to whichever color pin you want to light up (or both if you want both colors).
If you just want LEDs that work in your XBox and don’t want to mess with finding ones with the right specs, you can get them here:
http://division-6.com/shop/X-Box-Eject-Button-LED-Kit.html
December 7th, 2015 at 10:35 AM
This is a long shot, at getting a reply that is, but…. I am looking to do an LED mod on my original Xbox and was wondering if a bi color LED was necessary? I do not care to have the error light and was hoping to slap a purple LED in there. I am new to soldering and lighting so not quite sure how having a single color would be any different.
December 7th, 2015 at 10:22 PM
@Shirokuma: You can use regular 3mm single-color LEDs in your XBox. During normal “green” operation they will be purple (or whatever color you put in), and during errors they will turn off instead of turning red. Since there are only 2 pins per LED instead of 3, connect one to the center hole/pad and the other to the one marked “normal” on the drawing. You might have to use trial-and-error to get the right polarity (if the LED doesn’t light up at all, flip it around)
August 3rd, 2017 at 7:51 PM
This exactly explained what I was trying to find out, and did it very succinctly! Thanks a ton, Scott!
March 10th, 2019 at 11:50 AM
Glad I could help!